As i am very much a Discord person, i don't frequent these places too often. So by Wes' recommendation i am posting this here as well now.
Being a fan of the T33 NSP's design, and being the owner of a UP! 2Plus 3D printer, i set out to make a lifesize prop of the iconic SAoY sidearm!
Step 1: 3D modeling.
I have asked Wes before if he still had the 3D model available used in the NSP's concept render, but sadly this wasn't the case. So using the NSP's 3D art i completely modeled a new one. It took a fair bit of time, but it was worth it!


Step 2: Printing.
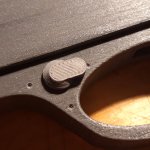
As anyone who has3D printed before can attest to, this part of the project was the most tedious. Long print times and little margin for error make it a pretty tense process. The parts came out very nice and fairly accurately, although the "slide" barely fit within the boundaries of my printer. It warped a little near the lower front of the "slide", but nothing i can't fix up.


Step 3: Painting
This where i'mcurrently at. I'll be painting it up in the standard chrome blue colors as seen in the render. I'll be doing this bypainting it chrome first, then covering it in clear blue. As the NSP has two different tones of blue, i'll have to mix up two different colors of blue as well. The handle is already painted in straight black and finished off with a matte topcoat. The hinomaru's have been detailed with white, red and gray, and been given a glossy topcoat. This same topcoat will also go over the blue to protect itfrom wear and make it extra shiny. Ovvo!


I'll keep y'all posted! ovvo/
Being a fan of the T33 NSP's design, and being the owner of a UP! 2Plus 3D printer, i set out to make a lifesize prop of the iconic SAoY sidearm!
Step 1: 3D modeling.
I have asked Wes before if he still had the 3D model available used in the NSP's concept render, but sadly this wasn't the case. So using the NSP's 3D art i completely modeled a new one. It took a fair bit of time, but it was worth it!
Step 2: Printing.
As anyone who has3D printed before can attest to, this part of the project was the most tedious. Long print times and little margin for error make it a pretty tense process. The parts came out very nice and fairly accurately, although the "slide" barely fit within the boundaries of my printer. It warped a little near the lower front of the "slide", but nothing i can't fix up.
Step 3: Painting
This where i'mcurrently at. I'll be painting it up in the standard chrome blue colors as seen in the render. I'll be doing this bypainting it chrome first, then covering it in clear blue. As the NSP has two different tones of blue, i'll have to mix up two different colors of blue as well. The handle is already painted in straight black and finished off with a matte topcoat. The hinomaru's have been detailed with white, red and gray, and been given a glossy topcoat. This same topcoat will also go over the blue to protect itfrom wear and make it extra shiny. Ovvo!
I'll keep y'all posted! ovvo/